Friday, December 27, 2013

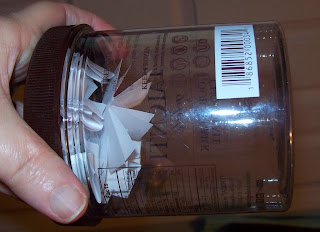
SHAKE, SHAKE, SHAKE!!

Hello all - hope you all
had a wonderful Christmas!
 
Just a quick posting to show who
won Fabric Giveaway #10.
 
Congratulations to FABIOLA!!
 
Fabiola, if you would please send me your
full name and address, then I will mail
you your package.
 
SHAKE, SHAKE, SHAKE!!!


Thanks for visiting me! Take care and may
God keep you safe and out of harm's way!
 
Conny


Sunday, December 8, 2013

TUTORIAL - BED QUILTS - MAKE-DO'S MINI STRIP QUILTS #5

WELCOME TO MY MINI BLOG

Sometimes I never know what to
say when I post. Anyway I must
tell you thank you for the
sweet comments that you leave.
And for all of those that are
new to my blog. BE SURE TO
SIGN UP FOR ANY 
GIVEAWAYS!!

I don't know about you, but
there is always so much on my
plate of projects to do.
Mini projects that
need finishing and more 'wanna do's'.
Let me tell you, my house is in an uproar.
My living room is moving as well as many of
my other rooms.
Trying to stretch my little house!
Hehehe
I get rid of things and
accumulate more. It is never ending.
On my remake blog, I hope to start back on
some of my quilting. My 2 sisters have
asked for quilts again. So I must go into
my stash of quilt tops and find them one,
or let them pick one out.
Too late to hand quilt
them so I must tie them together. When
I hand quilt, it takes me months to finish
the hand quilting. My white quilt took
me an entire year to complete.
So I do not know when I can get around
to making them a quilt.
In one of my mini apartments, there will be an
old lady in one of them that just sits and
makes quilts all day. I do not know
how long that will take me
to do that. 


MINI-STRIP QUILT #5 

This is the last of the mini-strip quilts until I
can get more little scraps together. Which is
not hard to do - just got to find them.
So now - break out with the cutting mat
and the rotary cutter and lets make this tiny
strip quilt. It is basically a large
LOG CABIN BLOCK with a couple of
changes.
All Lights should be on 2 sides
and
ALL Darks should be on 2 sides.
If you notice on my quilt - where the light
side is - there is a dark strip. 
And on the dark side beside the center
red block - there is a light strip where
there should be a dark strip.
I USE WHAT I HAVE so sometimes
things get changed.


TO MAKE THE QUILT TOP


As you can see there are 11 colors here.
Each strip is about an inch wide to 6 inches long.
You can make each strip wider if you want.
The red square is 2X2 inches.
A big square for the mini people!
Be sure to make the strips wider or narrower.
The choice is yours.
Hehehe


First
Decide what size you want.
This little bed
is smaller than many of my other beds.
So, my little
mini-strip quilt is only a mere 6X6 inch square.
Make it bigger or smaller - your choice.
Second - 
Separate your strips into
piles of light and dark.
I started with the light fabric.
Cut your red square the size you want.
To start - with right sides together,
place a light strip to the edge of the red square.
Stitch together. Cut off remaining strip.
With the same light strip, again
place right sides together against the strip
you just sewed and the red square.
Stitch together and 
cut off the remaining strip.
Repeat with the dark strips.
Repeat with the light strips.
Continue in this order till the little strips are finished.
If you need a reference - just look at the quilt!

Each side holds 4 strips of light and dark.
When you finish, then cut a wider strip
and stitch on each side for a border.
My borders are wide.
My Quilt Top is Now Done!


Third
My quilt backings are white THIN cotton.
I get this cotton fabric from
the inside of skirts and dresses.

Now, cut your thin backing fabric about 2 inches larger
than the quilt top.
For batting the quilt - use 2 sheets of 'Bounce' 
dryer sheets placed side by side
or do not use any batting.
Place the quilt top on top of the fabric backing.
Finger press it.
I pinned the red square in the middle.
Then I hand stitched around the square through
to the backside. 
Zoom in to see the stitches.
I quilted in the middle of each strips going round
like a box shape.
Quilt each border any way you want.

If you do not want to hand-stitch
- then TIE it with floss.
- or machine-stitch it 
Your choice.


Fourth
Quilting is finished.
My backing edging are turned to the front of this quilt top.
Be sure to turn under
a small hem and then hand-stitch down.
Also make sure that you trim away any of
the excess backing fabric cause you do 
not want or need to big of any hem on top.

Side view
Zoom in to see the quilting lines.

This is the back.
I hope you are making your mini people some
bed quilts.
It is going to be a cold winter this year and
we do not want them to get cold.
Hehehe
Many mini blessings to each and every one of you.
May God keep you safe and out of harms way!
Conny

Saturday, November 30, 2013

SHAKE, SHAKE, SHAKE TIME FOR #9

Hello you all!!
How have you been. I do hope
that everyone had a very nice
Thanksgiving!
Sorry that I am late!
 
Just 7 more giveaways are left - SO
Sign up for all of them!!
 
SHAKE, SHAKE, SHAKE
 
CONGRATULATIONS
TO
WYRNA!!!
 
Be sure to email me with your full name
and address!!


Thank you so much for visiting me!
Conny


Sunday, November 24, 2013

TUTORIAL - BED QUILTS - MAKE DO'S MINI STRIP QUILTS #4

Hello Everyone!!
Hope all is well. Thank you
for your sweet comments.
They are greatly appreciated.
The next giveaway will be a little
late because of Thanksgiving.
HAPPY THANKSGIVING!


MINI-STRIP QUILT #4

As you can see - this quilt is really scrappy!!
I did not concern myself with any
kind of normalcy with the blocks.
They are haphazardly put together.

This mini strip quilt is reversible.
It turned out so cute and scrappy!
This quilt only has 2 rows of
mini blocks with 2 extras for a pillow.
It is machine quilted
with no batting.
I have been known
to use a DOWNY SHEET if I wanted batting.
It is thin and smells wonderful!!
But for these little quilts - I did not put any
batting inside. 

GET YOUR STRIPS READY!

First - 
cut a small center square any size
 or color you want.
If you notice each block - around each little square,
there are 4 light or dark triangles that surround
that center square.
Then another round of  triangles surround that row. 

Second
Take a strip and sew to the center square. Cut off
the strip to any size you want. Then shape
that block by cutting it into a triangle.
Repeat to the other 3 sides.
Repeat for the last row of triangles.
Make 12 blocks and sew 10 of them together.
(Leave the last 2 for a roll pillow).
Cut 2 wide strips any size you want and sew
on either side of the 2 rows of blocks.
Sew 2 more strips to the other side of those.
This gives you the width. 
For the roll pillow - stitch 2 together and sew on a
little strip to each side to make the pillow wide.
This bed is small so the mini quilts are not big.
All of them are only 6 inches by 6 inches.
See how the blocks do not match up.
So cute!
I like it!!
This quilt is reversible - so here is the back.
In quilting this is called a string block.
It is mini strips merely sewed together on the
diagonal! 
I love string blocks!!
This is the back of the quilt placed on the bed already.
So cute!!!
For the pillow - I used a another strip for the backing.
Sew the pillow together like a pillowcase.
Stuff full with cotton balls and stitch up the side.
This is a really scrappy mini quilt!!!
Use what you have.
Even a big patterned fabric will look small once
you cut it into real small strips.

 Finish edges -
Place the quilts together and pin in place.
Turn all the raw edges to the inside of the quilt.
Machine-stitch close to the edges all 
around the quilt to close.

To Quilt -
Look at the front and the back of the quilt to see where
the machine-stitching goes.
I did not machine-stitch the center at all,
but you can if you wish.

Sarah kicked the mini strip quilt off of the bed.
She got too hot!!
Thank you for visiting me!
Hopblogger

Wednesday, November 13, 2013

TUTORIAL - BED QUILTS - MAKE DO'S MINI STRIP QUILTS #3

Hello Everyone!
Thank you all for the lovely comments!


These are MAKE-DO QUILTS!!


Mini-Strip Quilt #3

This is the quilt that we are making.
Each colorful strip are made up of
8 blocks.
White strips are sewn in between
each colorful strip.


These are some pretty strips. Cut them
in any width that you want.
 I started with 9 strips, same length,
same width.
The white fabric here being used are
white apron strings.
See where I cut off the top!
You can get 2 strips from one apron string.
Cut off the side hems on these strings.


To make each colorful strip -
(sorry no pic), Sew 8 strips together
lengthways side by side.
Finger press them open.
This makes one large block.
Now, with a ruler mark off
one inch strips all the way across
the 8 blocks.
This gives you 8 different colored blocks
that are sewn together.
Be careful because they will come
apart very easily!!!

If they do start coming apart, do
not fret.
Take a white strip, lay it on top
of the colored strip and sew down
the length. 
Sew another white strip down the
other side, this way, that 
colorful strip does not fall apart.
Do not worry how 
skinny or fat the strip becomes.
Repeat with another colorful
strip, then a  white strip.
Repeat the process until
you get 5 colorful strips sewn together.
Make sure that you end
with a white strip.

If the quilt top is not wide enough
for your bed, just add as many
and as wide of a strip you need for
the borders. 
I used skinny strips - but you can
use as wide as you want. 
This is the front of the mini quilt.
It is very easy to see how I put this mini
quilt together. It does not matter that the
little one inch squares are lopped off.
It adds to the charm.
Anything goes in a
MAKE-DO QUILT!!
I will not quilt this one!
Must have one that is different.
It is so much fun to make these little quilts. I hope
you have enjoyed looking at them.

Thank you for visiting me!
Conny

Tuesday, November 5, 2013

TUTORIAL - BED QUILTS - MAKE DO'S MINI STRIP QUILTS #2

Hello Everyone
Hope all is well.
Thank you for your sweet comments.
You are all beautiful.
BE SURE TO SIGN UP FOR GIVEAWAY
#9. LEAVE YOUR COMMENT!!
I am sure that you all know how to
make a miniature quilt. I am just showing
you with a rotary cutter. A rotary cutter
and a mat makes cutting so much faster
and easier. Just be careful because the
rotary cutter is sharp!!!
Make-do quilts in my opinion is when
everything is slightly off. Maybe the
back is too small and you must improvise.
Perhaps the front is crooked or short on
one end. Its okay - just make the quilt anyway
and live with life's imperfections.
If you want quilts that are perfect then that is great
also. But these little quilts here are not meant to
be put into a quilt show. They are just meant
to be loved by their makers and those artists
around them.

So have fun while making these
small mini MAKE-DO QUILTS!


MINI-STRIP QUILT #2

I made a total of 5 little quilts before I got sick.
All of the little quilts are different.
This make-do quilt is hand stitched.
The backing and the
pillows are made from baby clothes.
The print
is just the right size for these quilts.
The best things about using baby clothes
is that you have a tendency to use them up
quickly so no repeat fabrics.

This is a cute quilt - my own design.
I named this quilt top - One Two.
I had the fabric so this little quilt became
coordinated. 
It is backed with a shabby looking baby pajama
top.
You can see how I quilted it.
Quilt it the same or not. Your choice.
Really cute from the side too!
Isn't it so cute!
I even made matching pillows and just
stuffed them with polyfil polyester filling.
Oops I forgot to stitch the pillows closed!!
This is the back.
Might be hard to see my hand stitching.
A rotary cutter and a mat makes it
quicker.
I used 8 of these strips, a little over 1 inch wide X 6 inches.
The width is entirely up to
you really.  Use what you have
for the colors.
Place 2 right sides together and take them
to the sewing machine. Sew them back to back
and place on another strip so as not to
waste any thread.
When you have sewed all of the strips together,
open them up, finger press open.
Close them back up and measure the size you see
here.
Make a pencil mark and mark the rest of the strip.
Cut them on the pencil marks and re-open them.
These are your little blocks.
Now I had a small piece of this burgundy and I decided
to cut it into strips and use it. I laid it out like I wanted
it to look.
Match up or sideways, it does not matter and take
it over to the sewing machine. 
Just remember your pattern.
Stitch together all the blocks.
Continue to sew until one strip is finished.
Replace it to your table.
NOW BE CAREFUL,
DO NOT GET CONFUSED
OF YOUR BLOCK PLACEMENT.
Cut the strip from the sewing machine and place
it back in the row where it belongs.
Continue sewing
each row until the entire mini quilt top is sewn together.

Take the remainder strips and sew
them to the sides to make the borders.

Quilt as you see I have done, or
quilt how you choose.
To finish the quilt - bring the excess backing
fabric over towards the front of the
quilt. Turn under and stitch down.

All of these mini strip quilts have imperfections.
That is what gives them their charm.
 
Thank you for visiting me!
Conny

Friday, November 1, 2013

ITS SHAKE, SHAKE, SHAKE TIME!!!!

Hello Everyone, hope you are
ready!!!
 
I had to go back to the doctor for a 3rd time for more
medicine. needed to get this stuff out of
my chest. Finally something is
is working. Prednisone. He only gave it
to me for about 4 days. Hopefully that is
all that I need.  I have never been on so much
medicine in my entire life!
 
Thank you all for participating is the
giveaways. It is my intention that all should
win as long as they leave a comment and are
on the followers list. I just do not know which
one you will win at which giveaway! If you have
won a fabric giveaway already and I draw your
name again, then I discard it and draw again from
the shaker. After everyone has won then I will
start the names over again if I need to, so you
could win a second time if you have entered all
of the giveaways!!
 
Sorry that I am late.
 
SHAKE, SHAKE, SHAKE!!
 
CONGRATULATIONS  GO TO
 
SUSAN KORMAN


SUSAN, I need your full name and address
so I can mail it out to you!
 
Everyone is in my thoughts and prayers!
Thank you for stopping by!
Conny


Sunday, October 27, 2013

I WON FELMA'S LOVELY GOWNS ON HER GIVEAWAY!

Hello Everyone!
I hope all is well in blog land
and no one is getting that
awful bug that has been
going around the world.
I still have
some of that cough but it is not nearly
as bad as it was.

I will post my giveaway next week for
all of you that are anxiously waiting.
I am sorry - it could not be helped.

OH MY LUCKY STARS!!!
This week I must talk about the lovely gowns
on Felma's giveaway that I won!
MY FIRST EVER IN THE MINI WORLD!!
AND I WON 2 DRESSES!!
Thank you so much! 
I will treasure them ALWAYS!
Felma does an outstanding job! 
Every gown creation that she
makes is a work of art!
She is truly blessed with talent!
Right now, the lovely gown are just temporarily
housed at Daisy's apartment.
Although she would
like to keep them - she cannot.
Poor Daisy!

They must go into a Bridal/Dress shop
when I get the opportunity to make it.
I do not know how long it will take
for me to make that.
I wanted to show you 2 close-up pixs of the gown on
the manikin.
Felma has placed little glass stones in the
choker necklace to simulate diamonds.
I was able to
see them because they twinkled.

There is a little opal in the center.
Love the hat!

 Here is a picture showing a front view.
A dress hangs on a hanger beside the little 
skirted table.

 Here is a side view with the purse.
I was so lucky to have won something so lovely!!
I was so thrilled that I forgot to show the
backs of them!
I think that I need instructions!!!
For sure I was a lucky duck!
Thanks again Felma!

Thank you for stopping by!
My thoughts and prayers are with you all.
Mini hugs and kisses to you.
Conny