Hello Everyone,
This apartment is taking me longer
than I have anticipated. So I thought
that I would give you a
little tutorial for your mini
doll.
I published this on my other blog.
Click here to see the doll that
I put it on.
NOW DO NOT BE SCARED!
LILY IS THE MODEL!!
MAKE THIS BUN SNOOD:
This is the pretty bun at the back of the wig. Her
bun is about a half inch or less in size!
It is very tiny!
NOTHING IS GLUED IN HER HAIR!!
SUPER EASY!!!!
YOU NEED A HOLY DOILY!
I have already cut a piece out to use.
Use the center of this piece where my
thumb is at. Place this inside area on the bun of
the doll. Lightly mold it with your fingers around
the bun to see how big you need.
Place the doily on the hair bun and walk your
fingers around the bun to see how big you need
it. Double check again. See how many of
the crochet lines that you need to stitch across.
Thread a small needle and knot it.
Start where you see my knot.
Weave the needle in and out
of the crochet. Stitch in a circle.
I need to stitch across about 5 of these
crochet lines for my dolls bun. Stitch it a little
bigger than the
bun and keep fitting it to the bun to make sure it
fits.
Stitch in a circle. See the knot where I started.
You must end here also.
Lightly gather the stitching with the thread.
It is starting to look like a hat. You can put your
finger inside to stretch it. Push it out a little.
Next, cut off all the crochet that extends beyond
your stitching. Do not cut your stitching. Be
careful.
It looks like a little cap now!
It is so tiny!
Place on the dolls head.
Now take the knot and pull on it so you now have
one side with the knot and the other thread is still
attached to the needle as is in the photo here
and subsequent photos.
DO NOT GLUE THIS SNOOD ON HER HAIR!
GLUE IS MESSY AND
THERE IS NOT ANY NEED TO GLUE IT.
DO NOT GLUE THIS SNOOD ON HER HAIR!
GLUE IS MESSY AND
THERE IS NOT ANY NEED TO GLUE IT.
Gather it good but not to tightly, and with your
fingernails see if you can push the excess
crochet thread under the hair on both sides
of her head.
Use your fingernail and make sure that the
snood is under the hair at the bottom.
If you do not have fingernails, use a pin or
a needle to help it.
Next lightly gather tightly and shaping
it again. Leave the needle on the
thread as you see here.
Once you are happy with the
way it looks and all the hair is tucked
inside, then gather it up not too tightly
and with both threads make a knot at
the top of the snood.
I find it easier
I find it easier
to make a knot with the needle still
attached. It helps to keep the thread
in your hands.
Cut off the excess threads.
All done with this part.
SEE, THIS WAS EASY!
Now with your fingernails, gently
push the crochet down in and around
the hair.
It is good to double check constantly in case
it comes out when you are not looking.
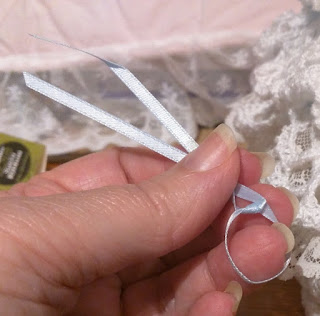
I bought this blue satin ribbon for a hair bow.
Take a long piece about 8 or 9 inches of ribbon.
Put it around your finger or thumb and tie just once
around. Leave an opening a little bigger than
your finger as you see here.
Place the ribbon around her hair and draw it gently.
Check each side of her head and under the bun also.
Make sure it is as you like it and then tie the ribbon into
a bow above the snood.
Do not make any unsightly knots.
Do not glue!
Do not glue!
Adjust the bow and cut off the ends at an angle.
Now sit and admire your work!
Now sit and admire your work!
How lovely it looks!!
I hope you have enjoyed Lily's Tutorial!
Thank you for visiting me!
Come again,
Conny
Conny


