Sunday, May 8, 2011

TUTORIAL - MAKE ANNA'S LACE BLOOMERS

Lets Make Anna's Lace Bloomers
 
You can use these directions to make
any pair of bloomers that you want.
You can use thin white cotton or
anything that has a little ruffle to
it.
If you use cotton you will have to hem it.
Anna's bloomers are made of lace so therefore
that is a step that you can omit.
 
This is the front of Anna's bloomers.
 
 This is the back of the bloomers.
 
 The materials needed for this project are
about 5 inches of ruffled lace or less.
And the lace is about
3.5 to 4 inches from the ruffle to the lower edge but go
with what is according to the size of your doll.
But I
use what I have that is available.
You will need a sewing
needle and white thread (or a sewing machine),
a couple of pins and a pair of
small or large scissors.
 
 Measuring is simple.
Just place your doll on the lace
as you see here. make sure that the ruffled part is
on her legs where you want the ruffle to be.
 
 Now take the lace and wrap it around one leg.
Make
it as tight or as loose as you want.
I don't like mine to be really tight.
Take the other side of the lace and wrap
it around the other leg to match up with the piece that
I have my thumb on.
Then add a little more lace for
to make a seam.
Cut off any excess lace.
 
 Now that excess lace has been cut off.
Place the 2 seams to the
left of the doll.
Make sure that you are
working with the wrong side of the lace. 
Place the doll back on top of the lace.
 
 A good rule of thumb is for the top of the lace is -
see her arms outstretched from side to side.
This will gather nicely.
Now pick up the doll & mark
with a pin where you need to cut off the top of the
lace - see the head of the red pin sticking out from
underneath Anna.
This pin marks her waist for what I want.
Another pin on the lace marks her crotch.
 
I have removed the doll.
 See - the 2 pins.
 
 With the doll removed.
Begin stitching from the top of the
lace - not the ruffle.
It doesn't matter if your stitches
are big - just don't make them too big.
Try to make
the stitches straight if you can.
Stitch to the lace ruffle
and back down to where you started.
You do not have
to start your stitches on the edge of the lace because
as you see anything to the right of the pin will be
cut off.
So start your stitches close to the pin.
 
 I stitched to the ruffle.
 
 Now I stitched back to where I started. Sewing
this way basically gives the seam
some strength.
Knot it.
 
 Cut off the thread and the excess seams.
 
As you can see - it looks like a slip
at this point.
 Time to stitch the legs.
Fold the skirt in half and start
at the ruffle.
Remember 2 legs will be going in thru
that ruffle - so you will have to
judge where to sew in 2 seams so that
you can cut in between them - this
makes the legs!
If you understand me - then sew up to the first pin.

 
 Anchor a few stitches by that pin.
 
 Now proceed down the other side.
Notice that the
stitches on the left side curve a little.
Stitch a small
curve for the right side of the leg.
 
See my stitches - they are not perfect!
 
 Now, take your scissors and cut
in between your stitches.
Do not cut your stitches and when you cut up to the
pin be sure not to cut those stitches.
Take the bottom
pin out and notice the red pin where its at on the lace
before you take it out.
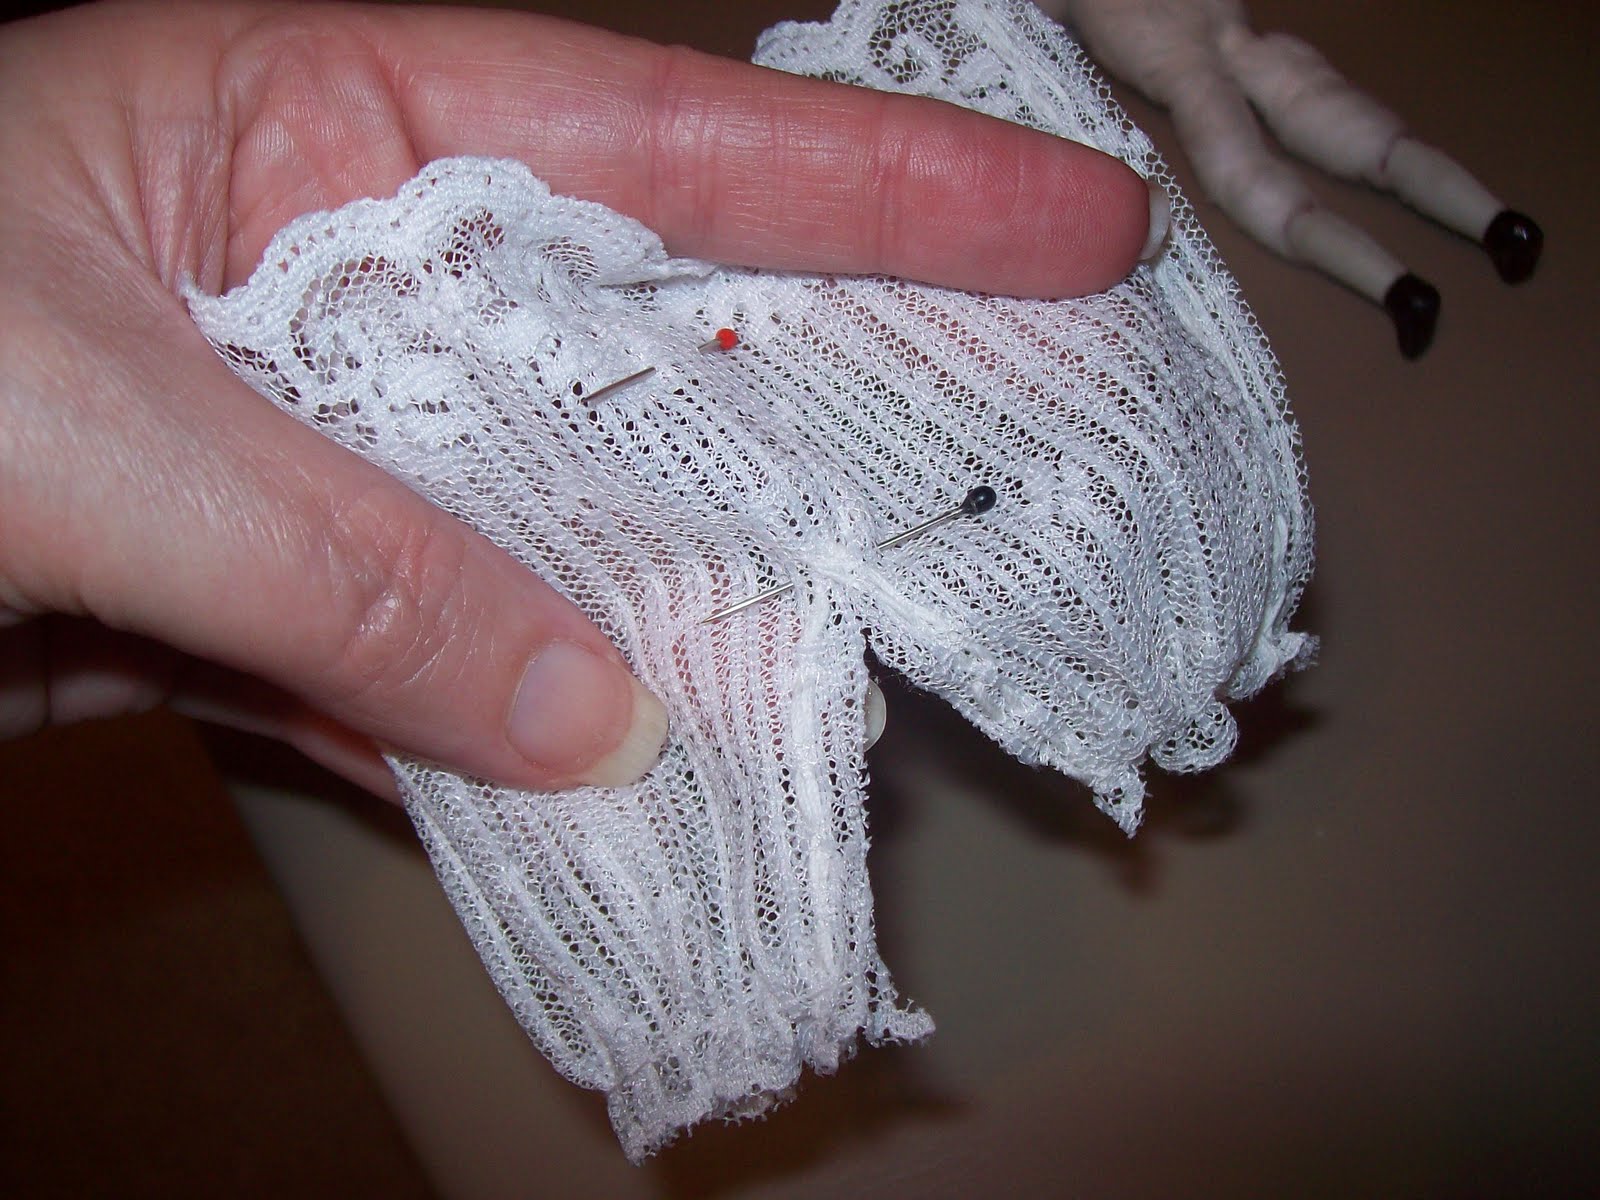
 
 Now turn your lace to the right side.
 
 Hold the lace like I show here and
with your other fingers
kind of pull or maneuver the lace fabric
gently to give it body and stretch,
and be careful that you do not break your seams.
 
 Get your sewing needle ready to stitch again.
 
 Place the lace back on your doll to make sure
where you need or want to cut the excess top of the
lace.
 
 Take the lace back off of the doll and cut off that
excess lace.
The excess piece you cut off can
be used as a belt.
I chose to re-use the lace for later.
 
 Turn under the lace and with your needle and thread
start stitching around the doll till you come back
to the front and the
threads meet.
 
Knot the ends of the threads.

 
 Just cinch up the threads to gather.
Tie in a knot or a bow.
Its all finished now.
 
 On this photo I just want you to see that the ruffle
isn't really tight on her legs.
I have tried to be clear in my directions.
I hope that you think so.
by Conny

Monday, May 2, 2011

DOLLS - BOUGHT 2 CHINA DOLLS TO MAKE-OVER - DOLL ON THE RIGHT

Now, we talk about the china doll on the right.
The woman dressed in plaid.
Amazon woman! 

 Her pretty apron is stitched with the
dress and the dress is cut crooked. 
You know, I believe that I have seen some
of this fabric over the years..


This china doll's body is made out of very
poor cotton.
Her body is almost see-thru.
A pinky/red color shows thru the cotton!


I took her clothes off.
Removed her head, arms and legs!

Her little body was stuffed hard
as a rock!!

At first I did not know what she was 
stuffed with until I started pulling
it out.


 Look at what she was stuffed with.
It is
DRYER LINT!!!

Something red was in the dryer.

How much lint would it take to stuff
one of these dolls?
And how long would it take you to collect
enough lint needed to stuff it!
Can you imagine stuffing a large doll
with lint!!

Next time I  decide to make a rag doll,
perhaps I will see how long it takes
to collect enough lint to stuff it!

Anyway her old body with lint is long-gone
away from me!!!
I got tired of sneezing!


Thanks for stopping by!
Conny

Friday, April 29, 2011

Louisiana Apartments - The Front faces the wall

My 1700s Louisiana Apartment building
has finally been completely bricked.

The part that you see with the ladder is the
front of the
dollhouse that was supposed to
face the wall and never to be seen.

I never intended for the front of the building
to be seen.
Had to empty everything
out of the building in order to move it
in front of my bedroom window.
It sure was heavy and cumbersome
to move.
 Had to turn the dollhouse
to get more light inside so my pics would
take better. 

So this left me with that problem on how
to make the front look somewhat symmetrical.
I googled Louisiana houses etc...and noticed
that some of their windows were shuttered.
So this is the plans for the front side of
this building - that is - when I get around
to it!
Got me to thinking. I have
decided to put window trim everywhere there
is suppose to be a window. I am then going
to glue shutters to the trim. None of the shutters will open.
This should solve that problem.

I like the ladder
that is propped up against the dollhouse. I do
have plans of painting it in a blue color.
Colors will change when I decided about the
shutter colors too.
The ladder is a little thick as you can tell.
 A painter needs to be up there painting.

Oops! my steps are turned the wrong way.
The
front door was painted brown & then white painted
on top. I am hoping that it kind of makes the door
look old.  
This door opens just to reveal a small
entry on the inside.
You must use your imagination of how
you rise to the other floors.
All of the space was needed for the apartments.

One day the house will be finished.
I always jump the gun and have fun with the
interior first.


This is the back side of the building,
basically the side that opens!
  The windows
are symmetrical until you reach the 4th
floor.

The reason for that is because
by the time I got to that floor, I wanted some
variety in the floor plan.
 I wanted
Apartments can get boring if everyone of them
look the same, only difference being
the furniture.

So, that middle window
originally held a kitchen beneath it.
Now I think that
it gives the building some character. 


 This is one of the side views of the building.
I still need shutters on the sides too.
Lots of work to still be done.


Thank you for visiting!
Please come again.
Hopblogger

Monday, April 25, 2011

TUTORIAL - Make Marina's Bottlecap Hat

Yes you heard it right!
I made Marina's hat
from a bottle cap.
As I stated earlier it sits really
good on an average miniature dolls head. 
A china dolls head is much bigger so I was trying
to figure out a good size.
That's when I thought about a bottle cap.
However if I was going to make Marina
another hat I would definitely use a bigger bottle cap.
 
Marina's clothes are actually
made from a small baby's infant pair of pants.
I think they were size 6 months.
These pants were stretchy.
Stretchy gives a little, cotton does not give any.
So if you use
cotton then you must be kind of accurate when you cut.
This is what I like about stretch fabrics.
You don't have to be so precise
you can s t r e t c h  to fit! 
These little pants had the
cutest pink ruffle going around each edge of the leg.
Sorry
that I didn't snap a photo of them before I starting cutting.
I just didn't
think about it at the time.
The directions are long but simple.
 
 Only a few supplies are needed:
a bottle cap - see the size I used
stretchy fabric that has a ruffle already attached
some cotton batting or cotton balls unrolled
glue & toothpicks
ribbon
decorative flowers or other of your choice
 
 Directions:  Cut out 2 large circles & sit
the other piece of the fabric aside. Make sure these
circles are a lot larger than the bottle cap.

 
Make sure the bottle cap is cleaned & dry. Place the
bottle cap down on the wrong side of the fabric &
draw around it. This piece goes on the inside of the
bottle cap.
 
 Cut this piece out and sit aside.
 
 Double the cotton and mold it around the bottle cap
to fit. Now take the cotton back off and be sure to keep its
shape.
 
 Take your glue bottle and dump a massive amount of glue
on the top of the bottle cap. A little glue along the sides.

 
 Spread the glue evenly all around the bottle cap and on the
top with your finger with a toothpick.
Take your cotton shape and put it over the glue.
 
 It should look similar to this.
Be sure to shape it with your
fingers all around before you cut off any overlapping
pieces.
 
 This is what the bottle cap looks like from the inside with
the cotton glued on the outside.
 
 This is what the bottle cap looks like with the cotton
glued on the outside. The cotton is wrapped around the
bottle cap to soften its hard lines.
 
At this point, you should have these 3 pieces. Place
the large circle with its fabric right side down on the
table or other surface. The wrong side of the fabric
should be staring you in the face.
 
Now take the cotton wrapped bottle cap and put a lot of
glue on the inside. Spread the glue evenly on the bottom
and the sides with the toothpick. Then lay the bottle cap
in the middle of the large circle.
 
Now it doesn't matter how you do it - there's no right or
wrong way. Start putting the fabric on the inside, smash
it down on the sides into the glue.
Work the fabric all around
the sides until it is even & there aren't any wrinkles on the
outside of the bottle cap.
This will take you a few minutes or less.
 
 The bottle cap should look like this.
All of the inside is
smashed down really good.
Make sure the sides are stuck good.
If its too bulky you will have to pull up
the inside and  trim it off so it will lay as flat as possible.
Then smash it back down.
There still should be enough
glue for it to stick.
Now take that little round piece
and put it on top.
You don't want this piece too big. It
should fit just on the bottom.
So pick it back up and
trim it.
Check to make sure that it fits if it doesn't
and it is still too big.
Then trim it again.
Repeat until it fits.
 
 Now put some more glue inside and stick that little round
piece in.
Smash it down good and with your fingernail or
toothpick push the fabric edges down into the fabric so
as not to see much of that cut edge.
 
 Now this is what you want it to look like. You want it
to be as smooth as possible.
 
 Now you can cut the ruffle off of the pants. I didn't measure
I just cut off a long piece.
 
 Now you have to clean up the ruffle. If there is a seam
then cut it off.
 
 Now clean up the ruffle some more. Cut off all excess
fabric up to the seam so it looks like this.
 
 Now measure the ruffle around the bottle cap. Cut off
a little more that is needed just for good measure. Set the
rest aside.
 
 Now glue the ruffle seam on the inside of the bottle cap.
It will look something like this. Also glue the side seam
of the ruffle. Make sure that its stuck down good.
 
 This is what it should look like on the outside. Take
your ribbon & measure it around the bottle cap close
to the ruffle. Cut off a little bit more to overlap the
ribbon. Set the ribbon aside.
 
 Now put glue around the lower edge of the bottle cap
just above the brim as shown. Do not glob the glue.
Be sure that when you glue the ribbon onto the hat
to start the ribbon where the seam of the ruffle is.
Keep the ruffle seam and the ribbon seam matched up together.
 
 Here is the ribbon glued on. Now take 2 pieces of
ribbon about 2 inches long.
Cut the ends at an angle.
Put glue on the untangled ends.
 
 Apply one ribbon at an angle on the ribbon seam.
Apply the other ribbon on top of the ribbon and angle it.
It should look like this.
 
 Now glue down your flower or other trim.
If you
use a flower like this be sure to glue down the green
leaves.
Your ribbon and ruffle seam should be hidden.
ALL DONE! ISNT IT PRETTY!
Thank you for visiting me!
Hopblogger

Saturday, April 23, 2011

Apartment Daisy - Meet Daisy!

Daisy is an older doll that I made
many years ago. It has been at least
15 years now that she has been boxed
up.  Time to show her.
She is a tall lady - 6 feet to be
exact. Not everybody is the same
height!
She is due for a make-over
but not just yet.
Saved for a future job.
Meet Daisy!

I was just learning back then
when I made my dolls. I made
them from the little doll kits
since they were cheaper. 
The internet was new and 
so I was buying these little
kits from Hobby Lobby.

None of them had any hair.
Their hair is molded on, so
a lot of my dolls got hair that
I glued on to the top of their heads.
Daisy is one of these dolls.
Sorry that I forgot to take pics of
the back of her head, but
her hair is done sweetly into
a ponytail.

Her outfit was rather simple
to make. It is made from 2 pieces,
a skirt and a top.
All I did for the skirt was
take a piece of black velour, the
length that I desired,
and glue a piece of trim to the
bottom edge of her skirt.
Then I gathered the top edge
with needle and black thread
and gathered it to her waist.
Draw it tightly and knot it off.
The top is the same piece as the
trim and it is just wrapped tightly
around the top of her and glued 
in the back. Be sure not to draw
too tightly because the ruffle effect
will go away. And you want some of
that effect.
The sleeves are just pieces of gathered
lace that was glued together and glued
to her shoulders.

I do have intentions later when taking it off of
her to place it on a manikin. I think it will
look good there.

The movers did a great job moving her furniture
in, but they left all of the re-arranging up to
her. Now she is so exhausted!
It took her a 2 full days making
everything fit!
She still has more room!
She is going to eat some bread and hope
to get some of her strength back.

Just a sneak peak into her dressing area. Do you 
like her new dress! Hopefully I can find a place 
for the new dress to hang. Still am moving things
around. Things might not stay as you see them here.
Thank you for visiting me.
Please come back!
Hopblogger