Sunday, March 3, 2013

DOLLHOUSE - THE VAN BUREN - Thatching Van Buren's roof!

Thank you all for the lovely
comments that you have left to
me.
You are all wonderful, sweet
ladies!
 
A big WELCOME to all of my new
followers.
I hope you like my blog!
 
 
Am still sick on and off.
But I did manage to get
the roof thatched.
Boy what a mess!
I am in love with the Skylights though!
It has made a
big difference inside the dollhouse.
Which I will show you later.
 
 All that is left is to find plastic for the window panes,
door knobs
and all of the other little trivial stuff.
 
 The skylights are not glued in and I do
not think that I am gonna glue them in.
I wanna be able to take them in and out
when I need to so I can get inside to move
things around.
For now the thatch helps
hold the skylights in.
 
Thank you for visiting me!
Enjoy your evening.
Mini hugs and kisses,
Conny


Tuesday, February 19, 2013

DOLLHOUSE - THE VAN BUREN - Painting and Stucco

I would like to thank all of you
that are looking at my blog
and following me,
especially all of those that
are leaving me some sweet,
kind comments.
I wish that
I could reply to your comments,
sometimes blogger will not let me do
that.
Ain't that a bummer!!
 
Have still been sick off and on,
so please forgive me for not
visiting your blogs.
I mean well.
 
Anyway I wanted to show you
more of what has been done on
my Van Buren dollhouse.
 
Painting on the outside.
This could make
anyone sick when you have to keep painting
and painting to get it white from where the
wood is dried out!!!
So the windows
and the railings and the doors
are very pristine white now.
Those red chimneys are going
to change colors right
before your eyes in this post!!
Hehehehe
 
 
 This is the very top.
Remember there was an ugly door here.
Well that is gone!!
This is going to be a skylight!
And the deck will be painted a bright white.
I do not know what I will do with this area so if you
have some ideas - I sure could use some!
 
 
 Here is another skylight cut out.
This area is where the stairs where located at.
Another skylight on the right side - do you see that one?
 
 
 This is the skylight almost in front of the stairs and
is certainly in front of the bathroom door.
My hubby
is doing some work adjusting the fit.
 On this pic
you can see where some of the wood split.
I will have to fix that.

 
 Here is the other skylight.
 
 
 I sure am liking these skylights!!
You can see clear
to the other side and this is exactly what I wanted.
I will be able to look from one bedroom down the
little hall to the other bedroom.
Ain't that neat!!
Also I have cleaned up the mess.
 
 
 Here is what the outside looks like with a couple of
the windows fitted in.
They will not be permanently fixed in.
As you can see the exterior is stucco.
It made a mess!
It is on the windows
and doors and I got scared!
With just a little bit of water on a paper
towel, it removed the excess stucco.

 
 I started thinking about the front.
I decided to put more stucco on the
window frames.
A good way to hide a mess.
I also tried to
get rid of that ridge beneath the top floor window
and the second floor window.
Also you will see
where some of the stucco is clumped together.
 
Since this is a LARGE dollhouse I think it looks
okay.
At least I am happy with it.
To me it looks
like the house is old and some of the stucco is
falling off.
I liked that effect even if it was accidental.
Also I want to say that I mixed a lot of white paint
in with the stucco to lighten it.
I did not want the
stucco so dark to where it just looked like mud.
I was not trying to achieve perfection on this dollhouse.
But that did not happen, so I
am just having fun.
 
 
 This area does not look bad at all.
The balcony is
a bright white as is the doors.
More clump around
the windows to hide the moldings.
 
 
 This is my Van Buren dollhouse nearly completed.
My pics are probably not that good because in my
Kitchen I get a tremendous amount of light.
So it is
hard to take pics here in this area.
 
 
 I wanted you to see if you could see this picture
better with how the stucco is clumped up.
Remember, this is a large dollhouse so to
stucco it very daintily to me would not look
right. 
Also, see the chimney!
Both of them took me 3 days
just to stucco them.
Hubby and
I had to keep turning the dollhouse over and
over so the stucco would not fall off of
the chimney's until they stuck.
 
 
The last thing to do is the roof.
And that is coming next!!!
It will be thatched.
 
I wish you all well and to spend a lovely
evening with the one that you love.
Thank you for visiting me!
Many hugs and kisses,
Conny


Friday, February 8, 2013

TUTORIAL - MAKE AN IDEAL PETITIE PRINCESS VANITY SHABBY CHIC!!

MAKE A SHABBY CHIC VANITY
FROM A

IDEAL PRINCESS PETITE VANITY
FOR YOUR MINI DOLL

Thank you to my new followers.
 
I hope you find my ideas from my blog
helpful and easy to use.
 
Thank you all for the lovely comments
that you have left me.
You are all so sweet!!
 
Please bear with me as I have been sick again.
I thought that all was finished with shots but apparently not!
However I am still feeling
sickly with nausea and headache!
But still I have managed
to finish this vanity that I wanted to show you.

This is the 2nd vanity that I have made with
one of these Ideal Petit Princess Vanity's.
The First one being for the witch Permelia.

When looking for one of these to buy
look for ones with a good mirror!

When I started doing this, these
vanity's were cheap. The price has
gone up some since this posting.
 
Shabby Chic can be
all white, an off-white, ruffles or colors
or tattered, torn or aged. It is up to you.
As you can
see I have another apartment building
and this apartment will be
on the top floor.
 
I will show you the
new building in another posting.
I am looking for colors other than white to mix with the
clean white walls.
I need some perfumes and other
stuff to go on top of the vanity so I am looking to see
what I might have that will work.

This is the front.
 
 Sometimes ago I bought from the thrift
shop a pair
of baby shorts that had sewn
fabric pieces into a
shabby look. I feel in love with the muted colors.
However, the shorts were tiny and so there was not
much fabric to work with.
The little fabric I have left
I want to make a stool cover and make for a top for
the bed cover.
So as you can see I stopped at the back
but it does not matter - this piece will be to the back of the
wall.

This is what the back of mine looks like.
I ran out of fabric.
It is okay cause the back will be against the wall.
I just might add a strip of another fabric to hide
the white.
 
What to do first - is to strip off
the bad smelly skirt and toss it!
They can be ugly, smelly, or holy.
Wash the pieces if they are dirty.
 
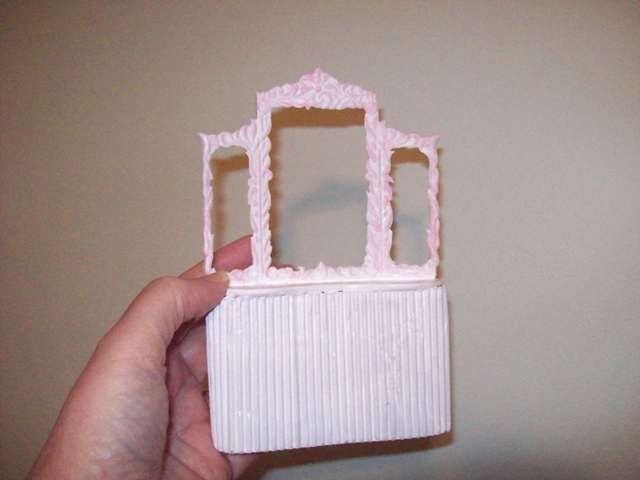
Remove the mirror and I peeled
off the strip of plastic that was on the
top of the vanity cause mine was
in bad shape. It showed glue too.
Peeling that off of yours, is up to you.
I do not want this vanity to look old.
 
I painted  the mirror frame
white and that took several coats
to get the whiteness that I wanted.
 
This picture  below shows you what the vanity
top looks like after I peeled off that
plastic. The glue kind of looks good and I
contemplated keeping it like that,
but in the end I opted to paint it.
The vanity top took up to 10 coats of white
to hide the glue.
The top is very shiny now, much more to my liking!
Do not bother painting the legs.
 
Paint the back of the mirror frame like the front.
 
 Next, I dapped some pale pink paint
on a paper towel, wiped it on the mirror
frame and wiped off the excess.
After that had dried, I started on the vanity.
I cut corrugated cardboard
(sizes are shown below), to the height
that I wanted.
(SEE THE DIRECTIONS BELOW FOR THE CARDBOARD)
(USEGOOD STURDY CORRUGATED CARDBOARD)
Then painted the cardboard white with 2 coats
as shown below.
 
This is the back and I also painted it
with 2 coats of white paint. 
It kind of looks nice just like this!
You can glue lace on over this corrugated cardboard
for a different effect and it will look pretty.
My next one might be lacy!
 
Once I made the cardboard tube
I slipped the legs of the vanity inside of
the cardboard and glued the cardboard
to the edge of the vanity.
The legs help to stabilize the vanity so
leave them in there.
This is what it should look like with the legs inside.
 
You can see my measurement
written on the inside of the cardboard.
 This is the measurement that I used for the width.
You can go smaller but I would not recommend going
any higher than 2.5 inches in height.
 
For the circumference of the cardboard
tube - you will have to measure it,
but it should be about 10 inches.
  You will need some cardboard to overlap
so you can glue it together as you
see I have done already.
 
This is all there was to making these vanity
useful for our miniature dollhouse dolls.
I still have to make a stool to match because
I never got the matching Petit Princess stool.
Hope you decide to try this!
Thank you for visiting me!
Hopblogger

Wednesday, February 6, 2013

Apartment Daisy - Daisy's Blonde Wig

I dont know how this happened. It
was never expected.
But when
I took off Daisy's hair it remained in that
position.
It looked so cool that I thought
I should display it on top of her vanity.

I was thinking about painting the entire
face and head white but these days what I
think and what I actually do are 2 different
things in my head.
One minute I would like
to have it in a white color and the next minute
I like the face.
I hope it does not look too freaky.
So many decisions to make.
Maybe I should take another head and paint
it white to see if I will like it.

 I still cannot believe that I have
an entire wig that I made!
My first one ever!

 This is what the inside looks like. You
cannot even see the glue.

 To give the wig a good base I pulled out all
of the hair that belonged to this
little miniature doll head.
I wasn't using it and didn't need it.
I apologize for this blurry pic.

 The doll head had a little stick that was
stuck to the end of it. So all I did was stick
it into a piece of cork and then glue on flat
pale pink ribbon.
I think on the last posting, I said it was 
a toothpick. It was not. It is a head on 
a skinny stick. I still have some more of
these. Forgot where I got them.
These would be good in a haunted house!
Thank you for visiting me - come again!
Hopblogger

Sunday, January 27, 2013

TUTORIAL - Witch Permelia's Vanity from an Ideal Petite Princess Vanity

Hello Everyone!
I would like to welcome my
new followers.
Thank you!!
 
If you want to know why I did
not post last week go to
and read why. I did not feel like
repeating all of it again. However I feel
much, much better now!!

I did not take any pics here on this Tutorial -
but I do have pics on the Shabby Chic Vanity!!
 
While looking at the VINTAGE IDEAL PETITE PRINCESS
VANITY'S an idea struck in my head.
Believe me
the Vanity that I bought did not look this good!
My Vanity's top was peeling off.
The mirror was
not anywhere near the beauty of this mirror.
The skirt was dirty and smelly.
And I did not even
receive a matching stool!
My Vanity was very
cheap and ugly for $2.99. But it is okay for a witch!!
I do not like to tear
up something like this but I do like a MAKE-OVER.
I like to remake, remix and reuse items
to make better use of them.
So if you do this then try to
buy the worst Vanity you can!

This is what these vanity's look like.
I originally bought one like this cause
I wanted the mirror.
However these vanity's are short.
If I had a doll that was sitting and her legs
were posed in such a way that her
legs were spread out - then I would need
to keep the vanity this short.
But I like a little height. That is my own
preference.
 
 When I made the witch Permelia's
vanity and mirror, it was trial and error.
I had to find something that was
relatively cheap to raise up
the height that I wanted.

I washed up the mirror frame and painted the
ugly gold frame black.
Then I peeled up that speckled
ugly top. I did not like it anyway.

Man!! was I surprised to see
the beautiful look that the glue had left on the vanity
top!!
It looked like woodgrain!
I did not paint this!!!

This gave me courage to finish what I
was doing. 
I threw away the white smelly skirt
and it's gold trim.

To make the Vanity
taller what I did was to cut
good sturdy corrugated cardboard
to the height that I wanted which was 2.5 inches.
I cut the length to about 10 inches.
After measuring around the vanity, making
sure that would fit, I then
glued it into a tube.

I painted the corrugated cardboard
black and glued black lace on top of that.
Funny how the cardboard looks like fabric!!
I did not cut off the
Vanity's short legs.
I did the opposite - I used them for support for the mirror.
Then I used Tacky Glue
to adhere the skirted cardboard to the Vanity.

This is easy to do, but it can be time consuming.
I must admit that
I had to hold the cardboard in place till the glue held!
And this took about 5 minutes I guess
because I used a lot of glue!
After the glue dried I glued on some white
trim and then some black trim to hide anything that
looked yucky.
Lastly,  I glued back on the mirror. I wish
I could show you the underside of the Vanity but I
cannot.
These were the only photo's that took.
I did not know that I could even make it work.
But it did work!
 
 The fun came while decorating the top.
I reduced some pics of witches
and then stuck them between the
cracks of the mirror and the frame.
On top I placed
a tall white resin witch.
I would paint it but I kind
of like it white! There are some perfumes and a
brush on top.
To top it off I hung Permelia's
Pink Witch Hat on the edge of the frame!
I hope you like it as much as I do.
This is a
great project!
I bought another UGLY, CHEAP
IDEAL PETITE PRINCESS VANITY to make
a SHABBY CHIC VANITY.
Look for that tutorial on the sidebar!
That Tutorial will be better than this one!
 Thank you for visiting me!
Hopblogger