Hello everybody!
How have you all been?
Thank you for your sweet comments.
This is the bedroom, bath and the closet
area of the Inn. Irena always has nightgowns
tucked away for her guests to use. Especially
since many of them do not bring any suitcases
with them to the Inn.
Narcissa Nagg is on her way to the bed. Another
guess will come in a little late tonight and crawl in
on the other side.
Here is Narcissa Nagg. She is so tired.
Narcissa Nagg looks so sweet. She loves white.
I removed Narcissa so you could see the side
view a lot better.
I bought this cute little Fairy chandelier about
a year or so ago. I cannot remember the ladies
name who made it. I like it cause it looks rusted.
Remmy is always in the trunk. She likes to come
out at night to try and spook the guests. But they
are all used to her and pay her no mind.
Of course Irena always tells her to stop playing
games. Irena always opens the trunk and helps
her out.
This is a wood trunk that I got from Michaels
many, many years ago. I glued black leather on the
entire outside. Then I cut brown leather strips and
2 little brass rings to it.
It does open as you can see.
I made the inserts from cardboard and covered
them in thin fabric. I made this for another
apartment but never got to use it, so it is not
Halloween but still cute. At least I think so.
The tops are made of cardboard and covered
also in the same matching thin cotton.
A secret compartment!
I like the bottom.
Bemmy is under the bed peeking out. Ooo love all
of those cats! All of them were given to me over
the years.
A view of the bed without the items in the way.
I decided to leave the bras on the bed as brass.
Cause witches can have any bed they choose.
The white sheet and the white top sheet are from
a think piece of batting. I left a piece of it up on the
other side near the vanity so it looks like a witch
will soon be climbing in the bed. A little white pillow
is also made from the batting. I think I need more
little white pillows. All of the fabrics are from little
girls clothes at the thrift store, except for the black
that lines the bedspread. That was a little gift from
my granddaughter Elise many years ago.
The pillow shams are left open to take the pillows
in or out. After it was all made, I glued it to the
sides of the brass bedframe. Looks clean. An Inn
must stay clean you know.
A close up.
Am not sure if I have shown this purse or not. It
was also bought online and belongs to one
of the dresses. The purse looks good just hanging
from the chair like this. It belongs to one of the
guests tonight. It hangs on the vanity chair.
The black vanity chair has been
recovered with a glittery fabric.
I remember showing this vanity before
that I had made from a plastic vanity
that I bought online. Look at the sidebar
at tutorials, perhaps I show it there.
Here is a close up of the vanity.
I made the hat, printed out the pics and just put the
edges of the pics in between the mirror and the
frame. They are not glued. I love the witch statue.
I had contemplated in the past about painting it,
but cannot for fear that I would mess it up. Still
love it that way. All of the perfumes came from the
internet 3 or 4 years ago.
I have 2 of these chairs. You might recognize them.
I removed the seat and back cushions from both
chairs.
I took the arms off of a skeleton and glued them
on the chair arms. Afterwards I painted the entire
chairs black.
I recovered the seat and back cushions to match
the ottoman and glued them back on.
Earlier Hilda Hagg was sitting in one of the chairs
reading an old newspaper when Narcissa Nagg
started talking to her. Both of these witches are
dressed and ready for bed.
Hilda Hagg reading quietly to herself after
Narcissa left.
Hilda says: "Goodnight Narcissa".
Shortly after Narcissa left Hilda Hagg, Irena
asked her get up so the chair could go in the bedroom,
especially since Hepsibah Hallows had to sleep there.
Hilda got up and Irena said a few words and Hilda's
chair moved into the bedroom. Irena gave her a
green pillow and when and if Hilda wants a blanket
that Irena will get her one. A few minutes later Irena
also sent the other matching chair into the bedroom.
Wendy Wendlewood came in and got ready for
bed. She has a pillow and is about to fall asleep.
These witches do not mind sleeping in chairs.
Look at them - they have so much to talk about!
there are a couple of witches hats behind Wendy.
Each witches hold their hats in the hands. They
will fall asleep soon.
Just a close up of Wendy Wendlewood.
There is a wire bookcase that
used to be white, that is until
I painted it black. It holds
skeleton heads with extra
witch hats in case someone needs
one. I made these skeleton heads
many years ago and put them
on my blog here. These are the
easiest to make.
The bottom shelf holds the blankets. The blankets
match the pillows.
I made 5 sets, but I did not hem any of the blankets.
The middle shelf holds some scrolls and a book
bound in leather. I made the book many years
ago - the pages are blank. The aged scrolls
were bought online and were super cheap!
A close up
The bathroom is behind the wire bookcase. It is
a small area.
I printed out a template from online and filled
it with white tissues - double ply!
The green toilet paper rolls are from
Detta of 'Detta's Darling Dolls'
This was her idea and this is so cute!!
A better look from above. 3 rolls of
toilet paper made from ribbon!
A toilet roll even is on the toilet
paper holder! Detta also made the
ghost toilet paper holder!
I like this idea!!
Another small ghost coming out of
a picture frame was also made by
Detta of 'Detta's Darling Dolls'.
She is above the toilet and I never named
her.
Here is the tub area. Detta also made the
ghost towel holder from clay. The towels
are just scraps of open weave fabric.
Here is Cookie. She loves the bathtub.
This brass tub did not have
any faucets so Detta made some
from clay. Matches the toilet
paper holder and the towel
bar.
A close up of Cookie.
Cookie has a rubber duckie. He stays here all
the time.
The brass sink is a cutie. It is short but powerful!
I like the patina.
I skirted it with black net fabric.
The sink is under the window and beside
the dress closet.
I like the sink stopper. It surely does fit
here nicely!
The clothes. There is still an orange nightgown
and robe hanging. It is for the last guest to use.
I made this witch dress and hat back in 2012.
Permelia wore it. I took it off of her, felt I
needed to change it.
This is the back of the dress.
This is the front of the witch dress. The 2 buttons
are baby buttons. The pink hanger is a Barbie
hanger. The dress and hat was made from an
infants little dress.
Better lighting.
This was one of the first hats I ever made.
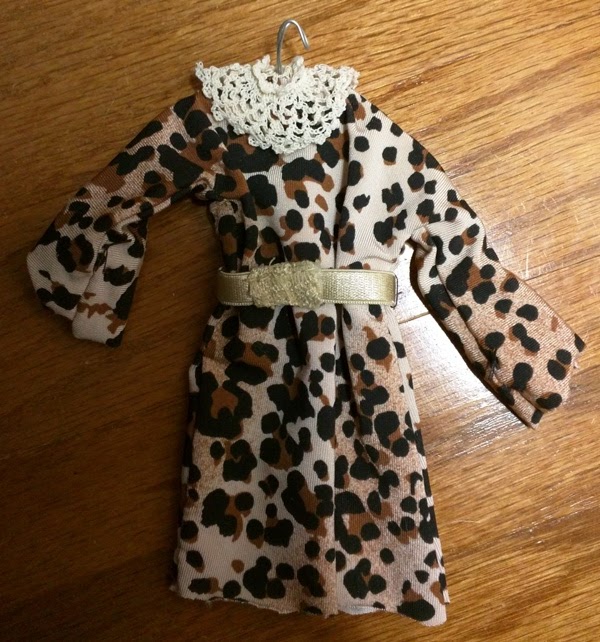
I made this dress from a nylon slip. The belt is
from the strap of a 'cami'. It works perfect here.
I made the dress hanger from a piece of wire.
The collar was easy. The sleeves and the dress
are not hemed. This is the back of the dress.
This is the front.
A short pink dress that belonged to a Barbie.
I cinched up the waist and added a belt. I thought
it looked good for a witch dress.
An up close view.
Here is the back view.
This little dress also came off of a doll,
although I do not remember what doll
it was. The patches were already on the
dress. Makes it look so cute. I added the
polka dot ribbon around the waist and the
black lace collar.
I made the wire hanger.
Here is the back of the dress.
I made this dress from tweed. It is just a
basic dress that I sewed together and
added a piece of orange thin terry-cloth as
an apron. This was made from a baby's bib!
The tie is a piece of the bib edging.
Here is the back.
This skirt and blouse was made by Detta.
Lynda from the
internet that makes the crocheted blankets sent me the old
lace that you see here. It had yellowed in spots
and was perfect as an apron and a collar. I have
given you Lynda's address many times so it should
be easy to find when you see the crocheted blankets.
Back of the skirt and blouse. I made the wire
hanger. I am not good at making them.
This is the set that I bought online at least
2 years ago. I cannot remember who I bought
it from. But I can tell you that it was not
expensive at all. I believe that it was made
for Dawn dolls.
A cute little set that I think
looks good with the witches.
A close up of the skirt.
The back view.
The shoes, hat and purse.
This skirt and blouse, and hat was
made by Detta!
Back view!
This cute little orange nitey and robe set was bought
online. I believe that it was also made for a
Dawn doll. This is vintage.
The robe back view.
The robe front view.
The little nitey. So cute!!
What hot cutie witch is going to wear this!!
Back view of the nitey. So sorry that you
had to see my ugly hanger!!
Here they all are - hanging up!
The black glittery sheer fabric hanging down
from the ceiling is the bathtub shower curtain.
After all 'the ghost COOKIE' does need some
privacy!! To the right is the yellow and purple
polka dot skirt and blouse that I made.
I will perhaps make some more and hang them in
the closet. Should be lots more clothes in there.
A little view of the sink, and more of the yellow
dress.
A better view of the glittery shower
curtain. It hangs from the ceiling.
Here is the yellow fabric skirt and blouse
with matching hat that I made.
Back view.
Above the closet view.
A better view.
The ghost is scrapbooking supplies.
I got the webs a long time ago.
I especially like the smaller
web with the spider hanging from it. It
blends well with the plastic of the windows.
Do not know where I got it from, but wish
that I had more of them.
The cat is trying to play with the big black
spider!
I made the shelf many years ago. I do not know
where or how I got this cat. But every once in a
while he moves around!
I made the capes many years ago. I believe that I
have already told you how I made them. The glittery
cape was made from a Barbie dress.
The top of the shelf holds scrolls which were
earrings. I made the purse. It does not open.
Some maps are beside the scrolls.
I like the look on the cats face.
Now the cat is mad and is showing you his back.
A finicky cat! This yellow tabby cat is made too.
I also move around this spider web.
I moved it here so the cat could stair up at
the spider. The cat keeps jumping up.
I hope you have enjoyed this last posting
of the 'TOOTHLESS WITCH INN'.
Irena loved having you visit here.
Thank you for visiting me!
Please come again!
Hopblogger