Wednesday, May 18, 2011

TUTORIAL - Anna's Half Slip

Anna's half slip is made just a little differently than
Daisy's half slip.
This slip also takes about 5 minutes
to make.
For this slip you will need to use lace that
is still attached to a skirt.
If you dont then you will
have to add a small piece of cotton fabric at the top and
this adds to the time that it takes you to make it.

The lace does not have to have a ruffle.
This slip can also be used for a skirt -
make the skirt with
the same directions that I give here.
The only difference
is that this lace has a ruffle and your skirt will
not have that.
Materials list is lace, needle & thread.
Ribbon is optional.
This lace is the same size as the
other slips.
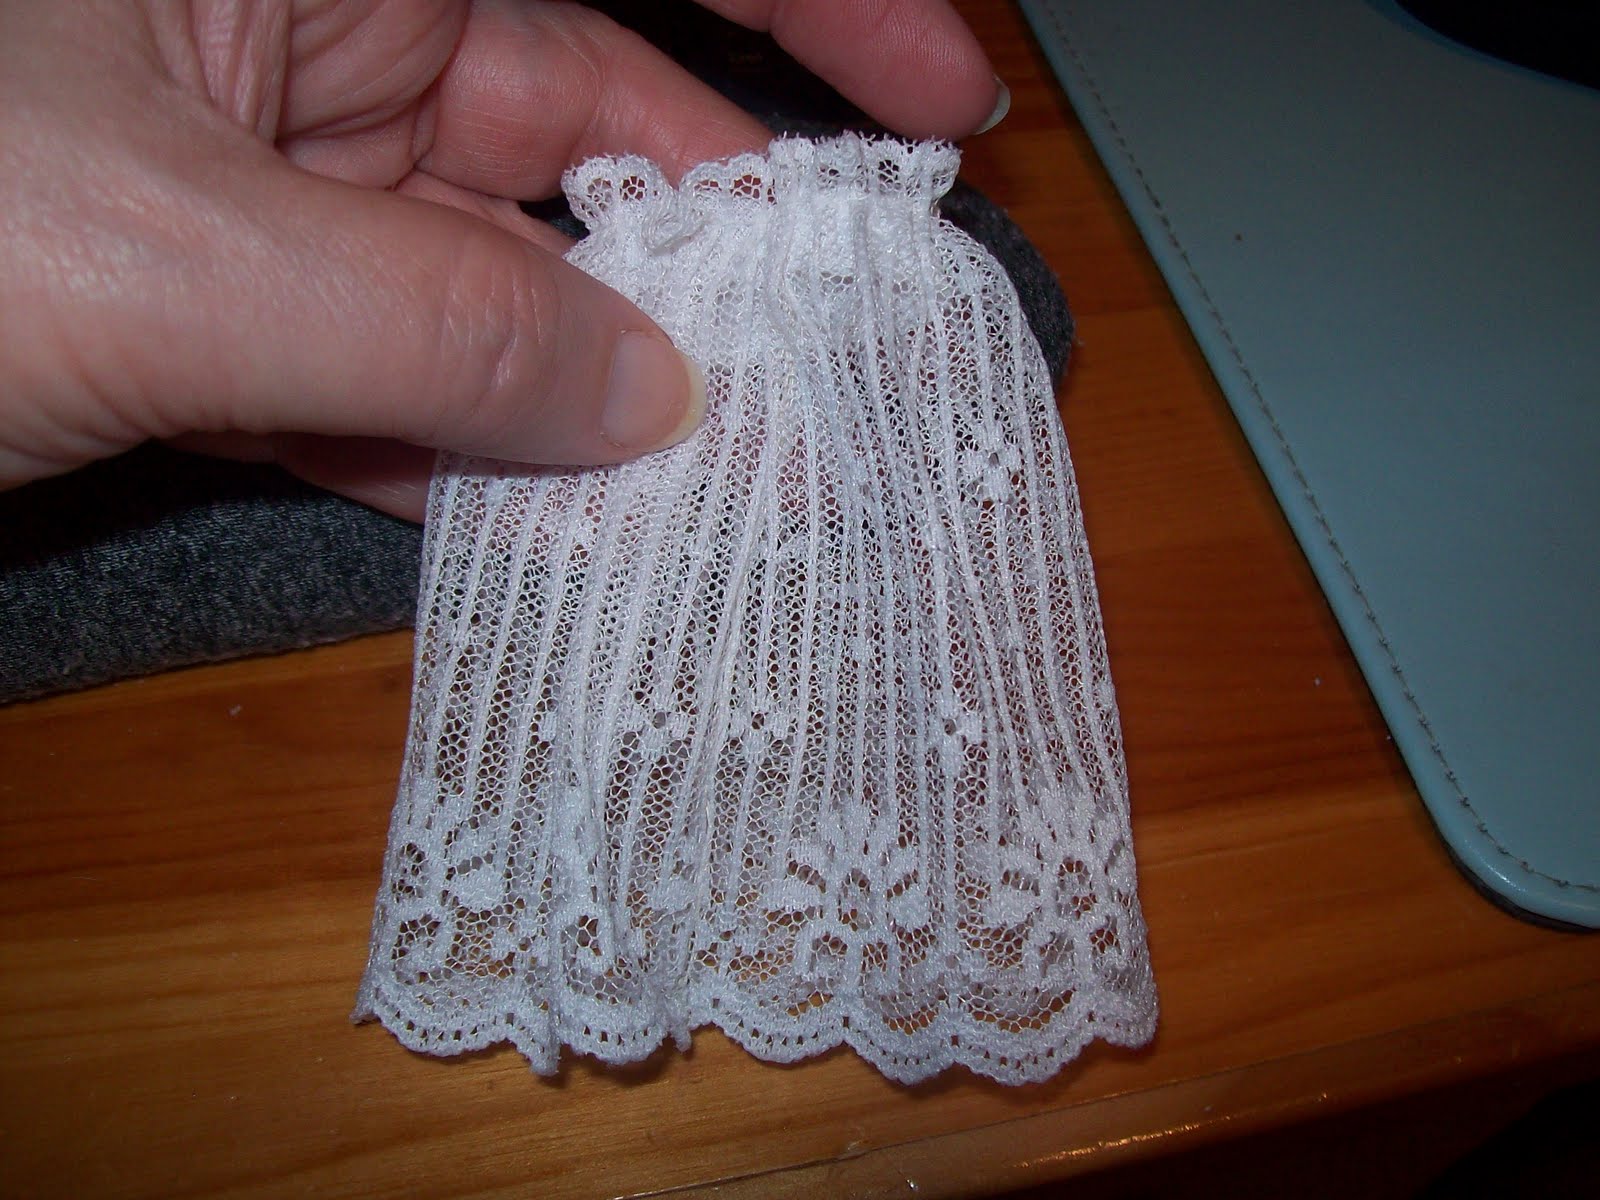
The lace is 3.5 to 4 inches long.

 To measure how big of a piece you need.
I know
the photo does not show you - but
all you have to
do is to place the doll on top of the lace.
Cut the lace
about 4 inches in width.
This allows for gathering. If
you think that this piece looks like its
too much gathering,
 then just cut off more.
This is something that you
will have to judge for yourself.
If the doll is skinny then you
can use less width.
I made Anna a little fatter because
of her face so that is why I cut it 4 inches.

When I cut the lace from the babys dress I continued
cutting straight up about 1.5 inches.
Try to cut
as straight as you can.
Cut the top straight across
to the other side and down to cut the lace away from
the rest of the fabric.

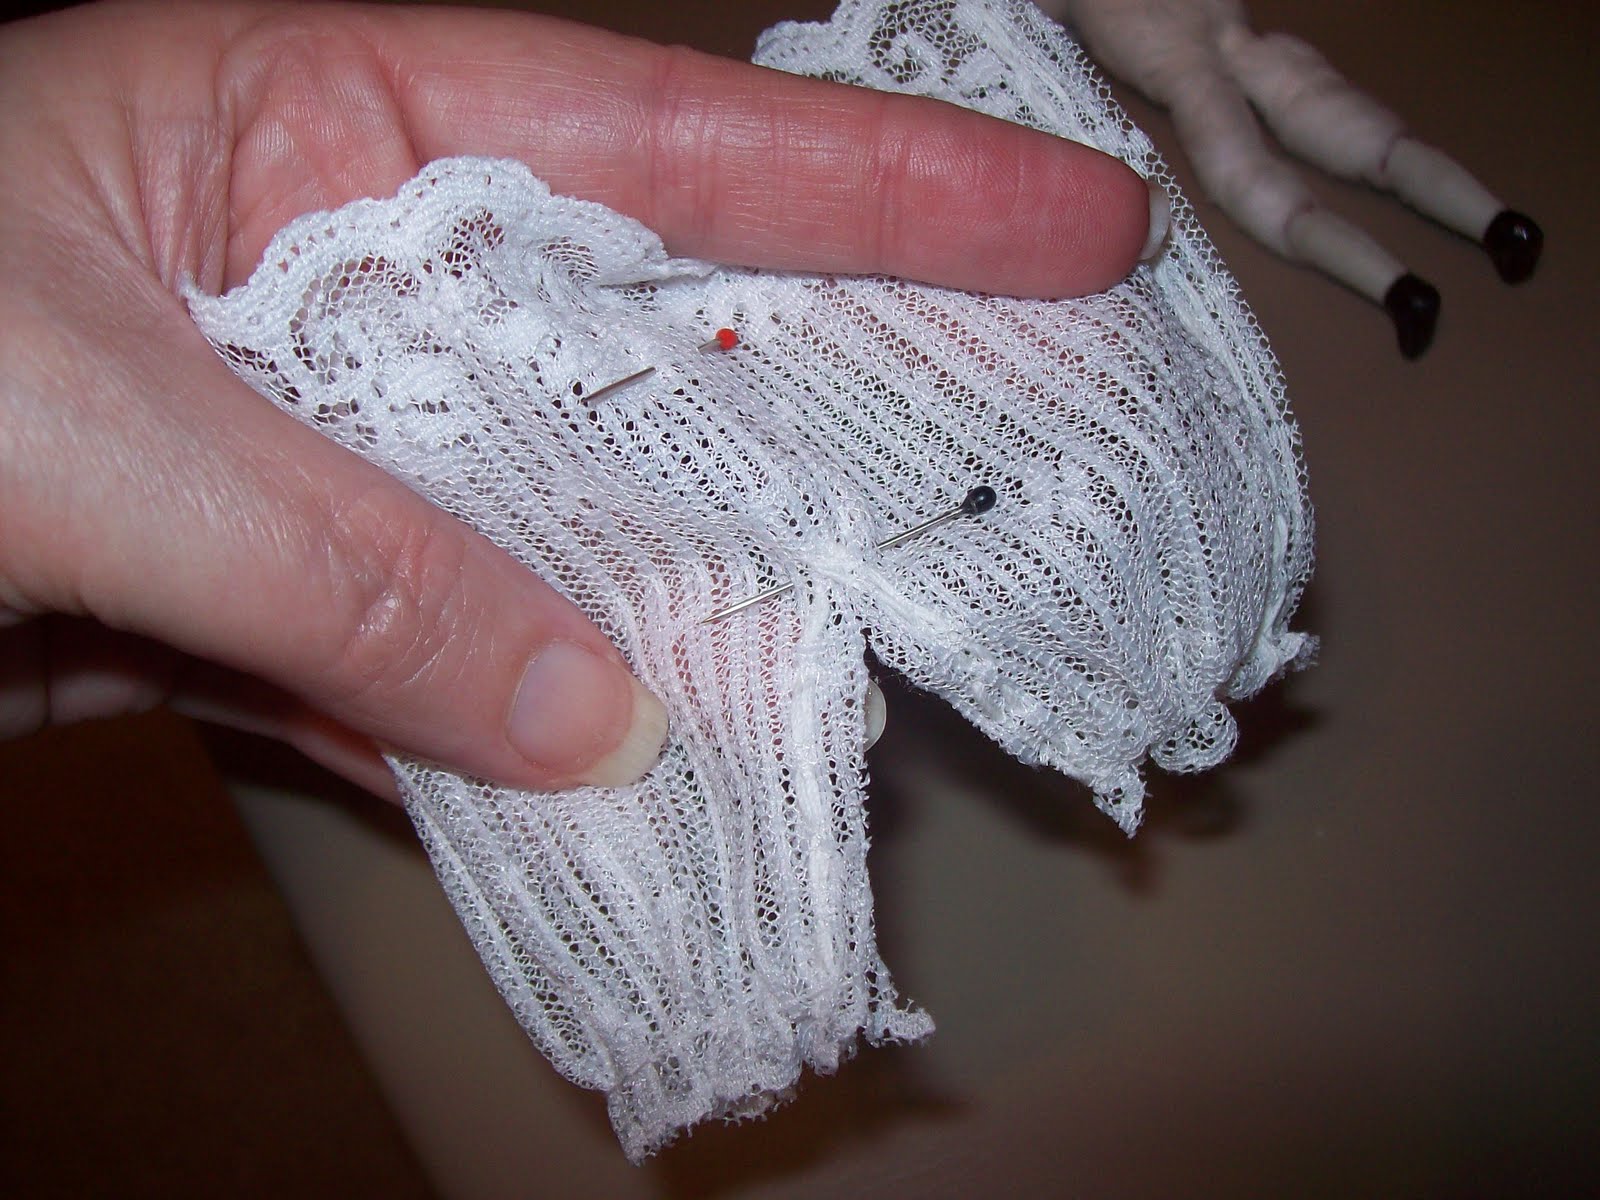
 Turn your lace over to the wrong side.
Turn the
raw edge under and if necessary pin it closed.
I don't
pin it - I just finger press
and try to keep it as straight as possible.
Do not put your edges down to the seam
because you will not be stitching that close to it.

 Now with a threaded needle, knot the ends.
Anchor the
knot on the wrong side.
Before you start to stitch - see
where my needle is.
From the edge of the fabric to the
needle is maybe about a half inch or less.
You can be
the judge of how much of that you would like to have.
If your lace does not have a ruffle
on the front then you can sew it from the back.
See my stitches - I am sewing
on the front side because
I have to make sure that I dont sew the ruffle down.

As you stitch be sure to make sure that the ruffle is out
of the way.
When you get to the end just knot the thread
on the back and remove the needle.

 At this point, put the lace skirt on the doll.
Judge how
far up you want the cotton fabric to be on her body.

On Anna, I have the cotton fabric going right under
her arm pits. Can you tell how much fabric is there
that I have pulled away from her body.
If you like
so far the way that it looks then thats great.
Now, remove your doll.

 Thread your needle with a long piece of thread.
For
all of these slips I use Candlewicking Thread.
That's
why the thread looks thick.
Put a knot on the end of the thread.

 Now on this part - you can just stitch big stitches going
from one side to the other side.
Be sure to leave about
a 2 inch tail.
I like for my thread to
be hidden on the inside.
That's just me.
Be sure that when
you get to the other side that you leave about a
2 inch tail of thread.
Then knot it & remove the needle.

 See what I have here - these threads are your
gathering threads.

 Now put the right sides together and make sure that
the gathering threads stay out of your way.
Start
stitching at the ruffle - not the white cotton fabric.

Stitch down to the lower edge of the lace and then
back up again to the ruffle.
Knot the threads and remove the needle.
I do realize that I dont have a
photo of the back seam stitching but if you
have been following the other slips then you
know how I work this.

 Now place the slip on your doll.
The threads go to the back.
Position the lace as you like.
Gather the threads and tie in a knot and then a bow.

 Its finished!
I like this slip pattern on Anna because it gives
added weight to her body.
At this point I am not sure
what kind of outfit that I will be putting on Anna and
Daisy.
The clothes that I have seen lately aren't
speaking to me.
As soon as I find something then I
will make a tutorial for their clothes also.
I hope that you have found this tutorial to be easy.
Enjoy your new slip!
Thanks for stopping by!
Hopblogger

Friday, May 13, 2011

TUTORIAL - A Slip in 5 minutes or less

You betcha!
 
Slips and skirts are so simple.
I am sure many of your know how to
make these.
But for those that are new to sewing
this is fast and easy.
 
Daisy, the little lady on the left is
sporting a half slip that only takes 5 minutes
or less to stitch up.
If you decide that you no
longer want her to wear it then it is easy to take
it off, rethread it with ribbon and drape it across a bed.
 
You can reuse this slip over and over again.
You can also make a skirt with these same directions.
Remember all of this lace that I am showing you
is being recycled from a baby dress.
Below I show
you 2 slips.
Next week, I will show you how to make Anna's
slip.
 
 Here is Daisy.
Material needed are about 4 inches of ruffled
lace according to the thickness of the doll.
Daisy is thin.
The lace is about 3.5 to 4 inches long from
the tip of the ruffle to its edge.
Also needed is a
sewing needle with thread.
Most of the time I sew these little things with
candle wicking thread or crochet thread. 
 
 My lace is cut from the dress so yours will not look
like this - that is if you buy your lace outright from
the store.
 
 I have to cut off the excess cotton. See - here I cut it
off very close to the lace.
Be careful not to cut the lace!
When you finish throw that little piece of cotton away.
 
 Turn your lace to the wrong side & be sure to match
up the bottom with the top.
Start stitching at the top of
the ruffle and sew down towards the bottom.
 
 My stitches aren't that small but neither are they
that big.
 
 For added strength ,I always sew back up
to where I start.
It also finishes it off better.
That way you
don't see a knot hanging from the bottom.
 
 Once you get back to the top - knot it off and cut off
your threads.
 
 Cut off any excess lace from your seams. That is
if you have any.
 
 Then turn the lace skirt right side out.
 
 This is the back of the slip.
With your threaded needle
start sewing close to this seam.
Do not sew the top of
the ruffle.
 
 Continue sewing all around the top of the slip.
 
 When you get close to the seam as I have done here
then cut off the needle and knot it.
Both sides of the thread is knotted.
 
 Put the slip on the doll with the threads towards
the back.
At this point do not gather the threads up.
First, make the first tie and use this tie to gather
the lace - then make your knot.
 
 Either make a bow or let the threads hang
down.
Or cut the threads.
All Finished!
Thanks for stopping by!
Conny

DOLLS - THE CHINA DOLL - MARINA'S SKELETON

Remember the china doll with the 
dryer lint.
Well, this is the first doll that I started with.

This china doll never did have any skeleton
beneath her lint!
She was a limp, wimpy doll.

My hubby was out running some errands
so I asked him to pick me up some pipe
cleaners.
He came back with some of the worst ones
that I have ever seen.
They were a pretty color but they were so
prickly!!
I hated touching those pipe cleaners.
I had to use pliers to hold them!!

I made MARINA a SKELETON.

Right now you cannot see how bad
she really was.
Her body parts were in terrible shape.
I could not get all of the glue off of her legs.


In fact - I could not even get the glue out of her legs!!!
No way was I going to get the pipe cleaners
inside of her legs!!!

The pipe cleaners are just glued to the top
of the glue!!!
I had to hold it down on the glue until each
pipe cleaner stuck. 
Can you tell that I had to hold it with pliers
that is why the pipe cleaners are a 
little flattened!!

I had to do the same to the arms!!!

Something must have been wrong with me - cause
normally something like this I would
have tossed it in the garbage!!
She was a lot of trouble.
Surprised at myself for finishing her.

With excessive use - this china doll
just might become crippled - that is
if her pipe cleaners break!!
She might need a wheelchair!


Finally - this is the wrapped body of
Marina.
I used cotton balls to wrap her.

Marina stands 5.5 inches high.

Oh, I did forget to tell you that her
head and breastplate is bigger than most
normal miniature dolls.
But hey none of us are built the same,
so why should a doll be perfect!

Must make her some bloomers.

Thanks for stopping by!
Conny

Sunday, May 8, 2011

TUTORIAL - MAKE ANNA'S LACE BLOOMERS

Lets Make Anna's Lace Bloomers
 
You can use these directions to make
any pair of bloomers that you want.
You can use thin white cotton or
anything that has a little ruffle to
it.
If you use cotton you will have to hem it.
Anna's bloomers are made of lace so therefore
that is a step that you can omit.
 
This is the front of Anna's bloomers.
 
 This is the back of the bloomers.
 
 The materials needed for this project are
about 5 inches of ruffled lace or less.
And the lace is about
3.5 to 4 inches from the ruffle to the lower edge but go
with what is according to the size of your doll.
But I
use what I have that is available.
You will need a sewing
needle and white thread (or a sewing machine),
a couple of pins and a pair of
small or large scissors.
 
 Measuring is simple.
Just place your doll on the lace
as you see here. make sure that the ruffled part is
on her legs where you want the ruffle to be.
 
 Now take the lace and wrap it around one leg.
Make
it as tight or as loose as you want.
I don't like mine to be really tight.
Take the other side of the lace and wrap
it around the other leg to match up with the piece that
I have my thumb on.
Then add a little more lace for
to make a seam.
Cut off any excess lace.
 
 Now that excess lace has been cut off.
Place the 2 seams to the
left of the doll.
Make sure that you are
working with the wrong side of the lace. 
Place the doll back on top of the lace.
 
 A good rule of thumb is for the top of the lace is -
see her arms outstretched from side to side.
This will gather nicely.
Now pick up the doll & mark
with a pin where you need to cut off the top of the
lace - see the head of the red pin sticking out from
underneath Anna.
This pin marks her waist for what I want.
Another pin on the lace marks her crotch.
 
I have removed the doll.
 See - the 2 pins.
 
 With the doll removed.
Begin stitching from the top of the
lace - not the ruffle.
It doesn't matter if your stitches
are big - just don't make them too big.
Try to make
the stitches straight if you can.
Stitch to the lace ruffle
and back down to where you started.
You do not have
to start your stitches on the edge of the lace because
as you see anything to the right of the pin will be
cut off.
So start your stitches close to the pin.
 
 I stitched to the ruffle.
 
 Now I stitched back to where I started. Sewing
this way basically gives the seam
some strength.
Knot it.
 
 Cut off the thread and the excess seams.
 
As you can see - it looks like a slip
at this point.
 Time to stitch the legs.
Fold the skirt in half and start
at the ruffle.
Remember 2 legs will be going in thru
that ruffle - so you will have to
judge where to sew in 2 seams so that
you can cut in between them - this
makes the legs!
If you understand me - then sew up to the first pin.

 
 Anchor a few stitches by that pin.
 
 Now proceed down the other side.
Notice that the
stitches on the left side curve a little.
Stitch a small
curve for the right side of the leg.
 
See my stitches - they are not perfect!
 
 Now, take your scissors and cut
in between your stitches.
Do not cut your stitches and when you cut up to the
pin be sure not to cut those stitches.
Take the bottom
pin out and notice the red pin where its at on the lace
before you take it out.
 
 Now turn your lace to the right side.
 
 Hold the lace like I show here and
with your other fingers
kind of pull or maneuver the lace fabric
gently to give it body and stretch,
and be careful that you do not break your seams.
 
 Get your sewing needle ready to stitch again.
 
 Place the lace back on your doll to make sure
where you need or want to cut the excess top of the
lace.
 
 Take the lace back off of the doll and cut off that
excess lace.
The excess piece you cut off can
be used as a belt.
I chose to re-use the lace for later.
 
 Turn under the lace and with your needle and thread
start stitching around the doll till you come back
to the front and the
threads meet.
 
Knot the ends of the threads.

 
 Just cinch up the threads to gather.
Tie in a knot or a bow.
Its all finished now.
 
 On this photo I just want you to see that the ruffle
isn't really tight on her legs.
I have tried to be clear in my directions.
I hope that you think so.
by Conny